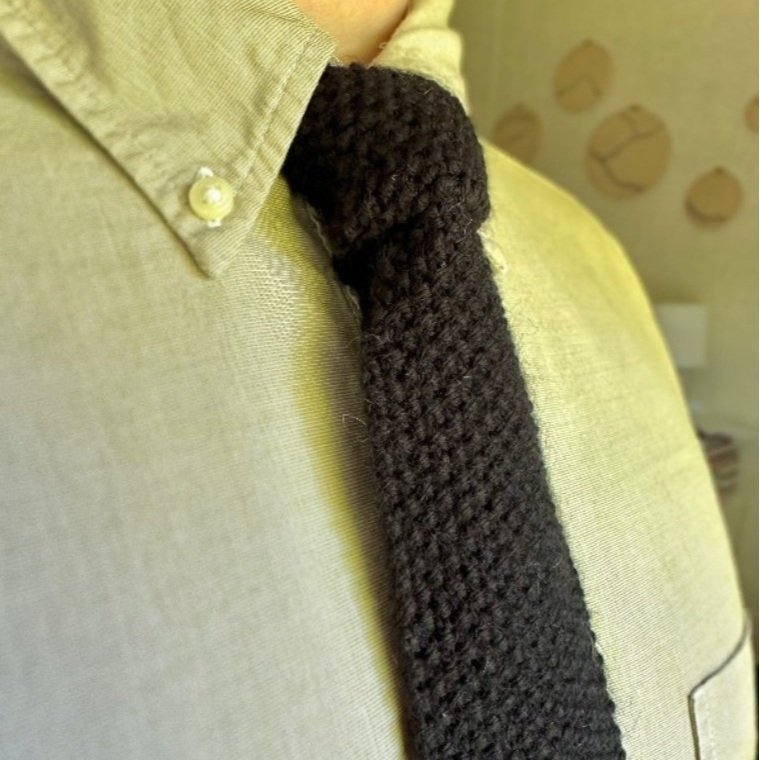
Father's Day is coming up, and if you're looking for a unique gift idea that's also handmade, why not try making a knitted tie? Not only is it a thoughtful present, but it's also a fun, easy, and quick knitting project that you can help you work through your yarn stash! In this post, we'll walk you through a modified version of a pattern from Studio Knit and show you how to make a stylish and personalized knitted tie for your dad.
Please note that this blog post contains affiliate links. If you make a purchase after clicking one of these links, I earn some yarn money at no extra cost to you!

Why a Knitted Tie Makes a Great Father's Day Gift
First things first, let's talk about why a knitted tie makes a great gift. For one, it's a practical item that your dad can wear to work or formal events. It's also a unique accessory that will make him stand out from the crowd. And of course, since you're making it yourself, it's a heartfelt gesture that will show your dad just how much you care.
Modifying the Pattern
Now, let's talk about this modified pattern. The original knitted tie pattern from Studio Knit features a solid color tie with a seed stitch pattern made in a worsted weight yarn. The original pattern is great, and I highly recommend you check it out if you prefer to use worsted weight.
However, when I went to make this pattern, I had LOTS of fingering weight yarn on hand. Also, I thought the look of the worsted weight tie was a bit bulky. Knitting it up in fingering weight yarn made a lighter tie that I thought looked neater, easier to tie, and a little more professional.
This modified pattern features all the adjustments you need to create the same tie Studio Knit designed, but just with fingering weight yarn. The modifications include changes in:

- recommended needle size
- the number of stitches you cast on
- the decreases
Knitted Neck Tie Pattern Details:
Size Available: Standard necktie measuring 2.375” (6cm) wide and between 57” – 59” (145 -150cm) in length.
-
Skill Level: Experienced Beginner.
-
Gauge: 28 stitches and 45 rows = 4” (10cm) in seed stitch
-
Bottom-Up: The knitted necktie is created from the bottom up and knitted flat from the cast-on edge.
-
Shape: A square/rectangular shape.
-
Texture Design: The entire necktie is knitted in seed stitch.
-
Reversible: This is a reversible pattern, because the pattern is visible on both the right and wrong sides of your piece.
-
Stitch Repeats: The texture is created with a 2-Row Repeat Knit Stitch Pattern that easily lies flat.
Supplies You'll Need
To get started, here's what you'll need:
-
Fingering weight yarn in the color(s) of your choice
-
Fiber type: Any kind of fiber will work with this pattern!
-
Color options: Of course you can make a solid color tie. If you want to add some more colors, please note that seed stitch doesn’t create the cleanest stripes. However, if you want to play with colors, I recommend using a self-striping or variegated yarn!
-
Knitting Techniques Needed:
For this knitted neck tie pattern, you will need to know how to knit and purl, as well as:
Knitted Neck Tie Pattern

-
Cast on 17 stitches using the long tail cast on method.
-
Knit in seed stitch (knit 1, purl 1) until the work measures 21 inches (53.5 cm) in length.
-
Now, we have to decrease. For decreasing, follow these instructions for the following rows:
-
Row 1: K2tog, * K1, P1 *, K1 (16 stitches remain)
-
Row 2: K2tog, * K1, P1 * (15 stitches remain)
-
Rows 3 – 8: * P1, K1 *, P1
-
Row 9: K2tog, * P1, K1 *, P1 (14 stitches remain)
-
Row 10: K2tog, * P1, K1 * (13 stitches remain)
-
Rows 11 – 16: * P1, K1 *, P1
-
Row 17: K2tog, * P1, K1 *, P1 (12 stitches remain)
-
Row 18: K2tog, * P1, K1 * (11 stitches remain)
-
-
Knit in seed stitch (knit 1, purl 1) until the entire tie measures between 57 – 59 inches (145 -150cm) in length.
-
Bind Off, Block, and Weave-In Ends.
Optional: Keeper Loop
Studio Knit includes an optional keeper loop in her free necktie pattern, and I highly recommend adding it to your handmade tie! This little loop allows the wearer to tuck the narrow tailpiece of the tie into the backside of the larger front piece. It helps keep the tie wearer looking professional and put together, and it is a nice finishing touch for a thoughtful gift.
To make a keeper loop for this modified Studio Knit tie pattern, follow these steps:

-
Cast on 15 stitches using the long tail cast on method.
-
Knit 6 rows (in garter stitch).
-
Bind off and do not weave in the end.
-
Thread the loose end through your tapestry needle. On the side of the tie you want to be the back, place the keeper loop in the center. Use the loose end to tack the keeper loop about 9-11 inches (23-26 cm) above the bottom of the tie. Use a another piece of scrap yarn to tack the other side of the keeper loop down.
Now, you’re all ready to block and voila! You've made a stylish and unique knitted tie that your dad will love. To present it as a gift, you could wrap it in tissue paper and place it in a gift box. Or, you could tie it around a small wooden dowel to make it look like a real tie!
I hope this tutorial has inspired you to try your hand at knitting a tie for Father's Day. Remember, the most important thing is to have fun and enjoy the process. Knitting is a wonderful hobby that can be relaxing and rewarding. And when you can create something as unique and special as a knitted tie, it makes the experience even more worthwhile.
Did you enjoy this pattern or have any questions? Be sure to comment below!